Posts tagged ‘craft: felt’
Giveaway winner & DIY small felt bucket
Our biggest German news site announced today that tomorrow the internet will have to be taken down for 24 hours to upgrade to IPv6. And then I remembered what day it was. Have you been fooled by someone today?
I promise this post will commence 100% April fool’s free. The deadline is up and we have a winner of my first blog giveaway.

Congrats, Renanda! Your easter surprise will hop its way to you.
Yesterday evening, my boy and I decided to visit the in-laws over the weekend. Which of course means my brain has been rattling with last-minute gift ideas. This morning, I set to work with some felt and embroidery thread I had lying around.

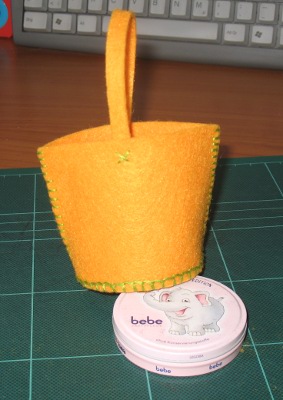
Please excuse the crappy picture, my camera batteries were dying on me. I’ve bought a new pack, which is currently happily trailing along in my boy’s backpack. D’oh.
I whipped up my own pattern for this cute little felt bucket. Here’s the basic steps if you wanna make your own:
You will need:
- colorful felt (mine was 2mm thick)
- contrasting embroidery thread and needle
- wash-out marker for the felt
- (metal) ruler
- x-acto knife and cutting mat or scissors
1. Find a lid or something round to trace onto your felt and cut out. I took a small jar with a 6 cm (2.5″) diameter. (It’s the one you can see in the photo propping up the bucket.)
2. Either calculate or measure the circumference with a piece of paper. I used paper to get a sense of how high I wanted my bucket to be. I ended up with a 20 cm (7.9″) long and 7 cm (2.7″) high strip.
3. Sew your base circle to the strip using a blanket stitch (here’s a good tutorial). Remember to sew the right sides together since you won’t be turning this later. I pinned the circle to the strip using some needles. It’s a bit fiddly, so you might want to glue it in place first.
4. Sew up one side using blanket stitch again. You now have a basic bucket shape. Mine bulged a little oddly where I sewed up the side, so I cut down the opposite side of the bucket and sewed it up again. This will give the bucket more of an oval and symmetric shape.
5. Freehand a strip for the bucket strap. Mine was about 0.8 cm (0.3″) high and 16 cm (6.3″) long. Sew it in place. (I thought the x-stitch looked really cute.)
Voilá, you have a handy-dandy felt bucket. It’d look super cute filled with easter grass and some colorful candy eggs. I plan to sew on some applications to spice up my bucket later, but I have to get thinner felt first.


